Basic Knife Safety: how do you safely use an outdoor knife?
If you frequently use knives when you are out camping or bushcrafting you know that it is important to pay attention to your safety. Especially when you are located somewhere where medical aid is hard to find. For that reason it is better to be safe than sorry! As a result we have listed a couple of practical tips and techniques that decrease your chances of accidents.
Contents
- Make sure your knife is sharp
- Use the right knife for the right task
- Take care of safe surroundings
- Beware of the triangle of death!
- Always store the knife in its sheath
- Carefully remove the knife from the sheath
- Take care of enough grip
- Move the targeted object, not the knife
- Select a proper base
- A couple of practical bushcraft cutting techniques
- Using common sense
Make sure your knife is sharp
You might think that a sharp knife is more dangerous, but the opposite is true. When you use a blunt knife you need to put more effort into using the knife making the chance of slipping even bigger. Also, a sharp knife gives you a clean, neat wound that can easily be stitched. So make sure you always take something with you to sharpen your knife in the field.
Use the right knife for the right task
A machete won’t do you any good when you are carving wood and a small bushcraft knife won’t help you remove blackberry bushes. But you should also pay attention to the solidity of the knife. It is not a good idea to go crazy on your knife if it isn’t full-tang. Also, a knife with a blade thickness of 2 mm is often not sturdy enough to handle the more demanding tasks. At the same time a thick ESEE 5 isn’t fine enough to filet a fish or carve wood.

Take care of safe surroundings
You are quite capable of paying attention to your own limbs and fingers, but if an unsuspecting camping buddy comes to close at the wrong time you could still end up with a fountain of blood. During different survival and bushcraft courses one often speaks of the blood bubble. That is the area located 360 degrees around yourself up to one to two arm length’s apart. When you are using your knife make sure no one gets close, or is standing in your blood bubble. Children should know they shouldn’t come close and if someone decides to join you stop using your knife. You could be very careful when it comes to your own fingers, but if someone else decides to get close and you slip all effort you took to take care of yourself has been in vain.
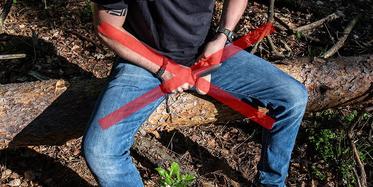
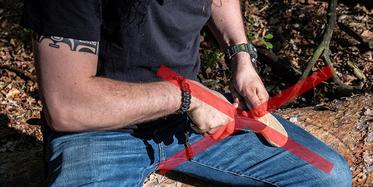
Beware of the triangle of death!
The triangle of death sounds rather dramatic, and if you do not take it into account it could actually become dramatic. The triangle of death is the area in between your knees and crotch. So the inside of your thighs and your groin. So many important veins are located in this triangle of death you will definitely want to steer clear of this area. If you hit one of these veins you can bleed out in mere minutes. Not a spot you want to risk hitting.
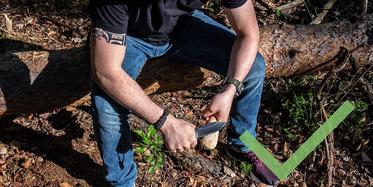
It is better to make sure that your elbows are leaning on your femurs. After all, when you do the targeted object and your knife will be in front of your knees. You could also decide to work on the left or right side of your femur, so away from your legs. If you make sure that the edge of the knife is always pointing in the opposite direction little can happen.
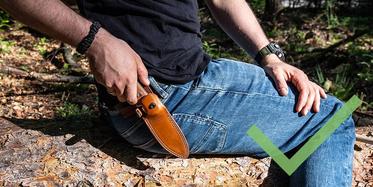
Always store the knife in its sheath
Just as important is immediately putting the knife back in its sheath after use. You don’t want to look for a sharp knife by feel. Or sit or stand on it. And we haven’t even discussed the chance of you losing your knife: a knife is perhaps the most important tool you don’t want to lose when you are looking after yourself in the woods for a week. Simply pop it back inside its sheath to make sure you will always have it when you need it. Also key: never walk around with a knife that isn’t placed in its sheath. Let’s say you trip over a branch or tree trunk. Trust us, you definitely don’t want to fall on top of your knife.
Carefully remove the knife from the sheath
Here we are talking about fixed knives. You carry those with you or store them in a sheath or case. One of the things that often happens is that you cut your fingers when you remove the knife from the sheath. Sounds stupid? Perhaps it is a little, but it occurs so often we would like to explain.
What happens is that you use one hand to remove the knife from the sheath while you use the other to hold it. At that point it is key that you hold the base of the sheath and not the top where the edge could cut your fingers.

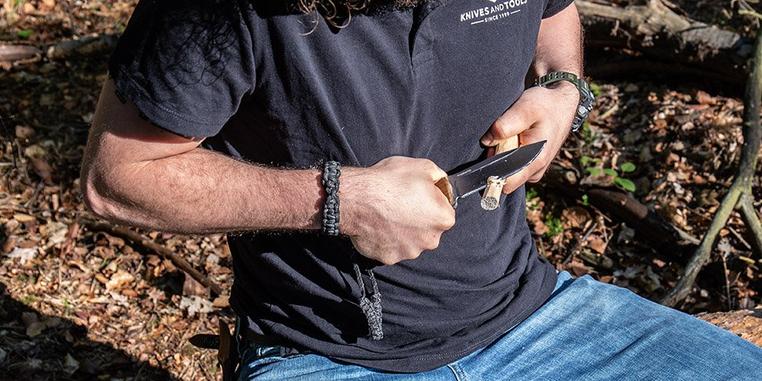
Take care to get a firm grip
When it concerns bushcraft or wood work your basic grip would be the simple hammer grip. Just imagine you are holding a hammer: simply put your fist around the handle, without any fingers sticking out. That is also how you hold your knife when it concerns outdoor use and bushcraft. In the basis you don’t place your thumb or index finger on the spine of the blade, unless you are carrying out a specific cutting technique for which it is necessary. With this fist grip you ensure that you won’t easily slip and end up on the edge. Teach yourself to always use this as a starting point.
For some cutting techniques you can also use the reversed hammer grip. Exactly the same, but with the edge pointed up.
Move the targeted object, not the knife
When you are working with wood it is always wise to move the wood instead of the knife. There are different handles and techniques that will enable you to keep the knife still and only move the targeted object alongside the edge.
When you hear this for the first time you might think that we go a little too far when it comes to our advices. However, when you trust survival and bushcraft instructors with years of experience you will know that this is the best way. As soon as you have gotten the hang of it you will understand that that is the way to control the cutting movement. Because you don’t move the knife you won’t risk slipping. The only thing that could slip is the piece of wood. However, rather a piece of wood that is flying around than a sharp knife.
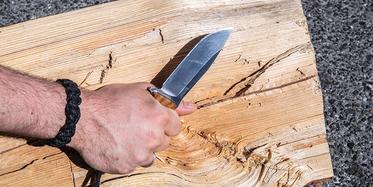
Select a proper base
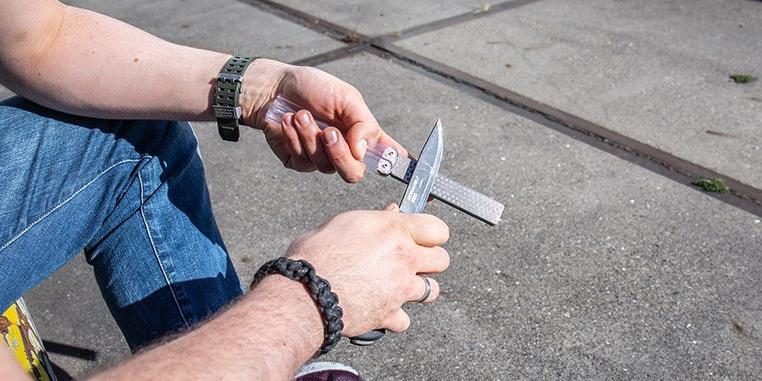
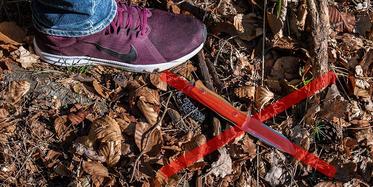
Always choose a proper base for the cutting work. Wood is fine, your femur isn’t. Don’t think: I will simply place this board on my knee, I only have to cut out a small hole. That small hole could, after all, become a massive flesh wound. Using a knife on a concrete floor is also not a great option. Both for the knife as for the people standing around you trying to catch the bouncing knife.
A couple of practical bushcraft cutting techniques
Many books have been written about cutting techniques for bushcraft. Many more than we could put here for you. Still we have described a couple of practical basic techniques that can help you practice improving your bushcraft skills.
The first and most important thing to know is that a knife is made to cut. This means that simply pushing it won’t do you any good: a knife needs a cutting movement to work. So try to enrich the cutting movement with small cutting nuances to neatly cut instead of push.
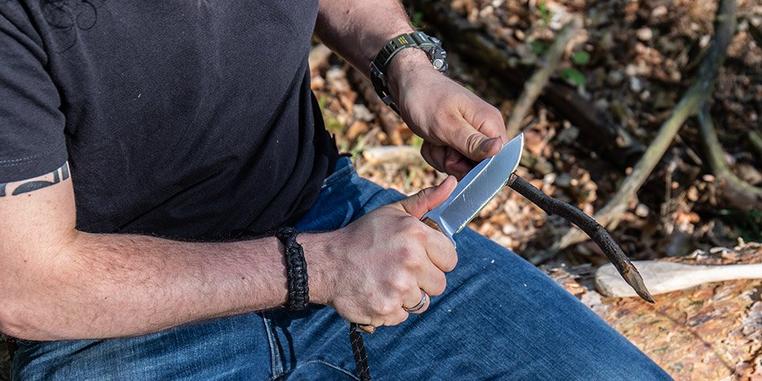
Chest Lever grip
This is a very safe cutting technique that will easily enable you to remove a lot of material. For this grip you are holding the knife in a reversed hammer grip. With the pommel against your chest and the edge pointed at your elbow. In your other hand you hold the piece of wood. Your arms are close to your body and you place the knife on top of the wood in front of your chest. By pulling your shoulders and elbows back you will make a pulling cutting movement in the wood. As a result you will be using your back and chest muscles enabling you to apply a lot of force in a controlled manner. The worst thing that can happen is that the piece of wood will slip. After all, the knife won’t move: nothing can happen to that.
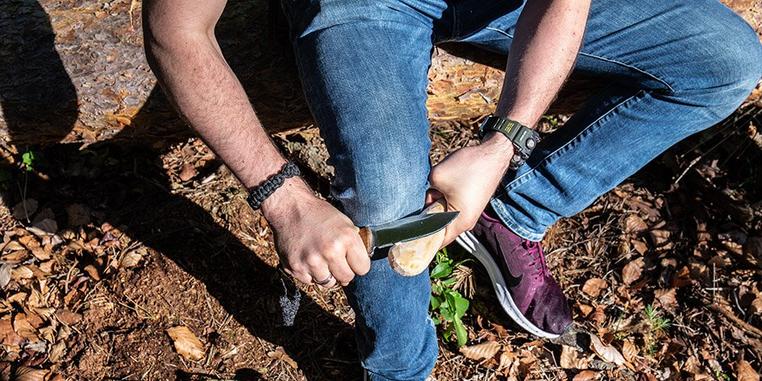
Knee lever grip
By placing the spine of the knife against the front of your knee you can apply a lot of pressure by simply pulling the wooden object really hard. The worst that can happen is that the wood can shift. Much better than a knife that is flying around.
Scissor cut
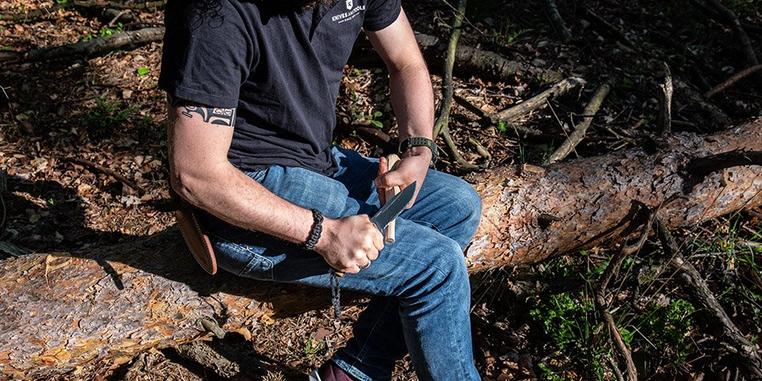
With the scissor cut you hold the knife in the hammer grip with the side of your fist against the outside of your femur. If you are doing it right the knife will now be pointing up. Subsequently you hold the targeted object in the other hand. The following should be done with a little feeling: you pull the wooden object towards you alongside the knife. By adjusting the position and the slope of the knife you control how much material you remove. The name scissor cut is derived from the fact that you constantly change the angle of the knife as if you are using a pair of scissors. You scrape it off. When you try it yourself you will notice how easily you can influence the cutting process.
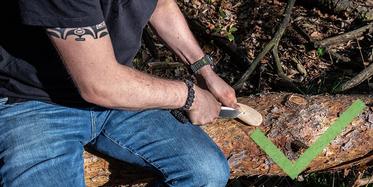
Notching
When you are making tent pegs, or are looking for a spot to attach your tarp with rope or a paracord, cutting a notch will be a practical skill to master. For it you work closely on top of your work piece. You hold the knife in one hand and use the other to hold the base of the branch you want to notch. Your hands work closely together for this cutting technique so look after your fingers. Put the knife on the spot where you want to make the notch. Now you place your thumbs on the spine of the edge to push the knife into the wood in a controlled manner. If this isn’t too much trouble you can push the knife diagonally into the wood to cut a little more than only push.
Using common sense
Down the line it is perhaps the most important advice we can give you: use your common sense. When you start something that doesn’t feel right, don’t do it. Consider Murphy’s law: if it can go wrong, it will. Always make sure you bring a first-aid kit with you and know how to apply a tourniquet.
Conclusion
Whether you have a survival knife, bushcraft knife, hunting knife or any other outdoor knife on your wishlist: you now know better than anyone how to use it as safely as possible! Don't know which outdoor knife you'd like? Then quickly check out our outdoor knives page!
?%24center=center&%24poi=poi&%24product-image%24=&fmt=auto&h=500&poi=%7B%24this.metadata.pointOfInterest.x%7D%2C%7B%24this.metadata.pointOfInterest.y%7D%2C%7B%24this.metadata.pointOfInterest.w%7D%2C%7B%24this.metadata.pointOfInterest.h%7D&scaleFit=%7B%28%24this.metadata.pointOfInterest%29%3F%24poi%3A%24center%7D&sm=c&w=1208)


?%24center=center&%24poi=poi&%24product-image%24=&fmt=auto&h=500&poi=%7B%24this.metadata.pointOfInterest.x%7D%2C%7B%24this.metadata.pointOfInterest.y%7D%2C%7B%24this.metadata.pointOfInterest.w%7D%2C%7B%24this.metadata.pointOfInterest.h%7D&scaleFit=%7B%28%24this.metadata.pointOfInterest%29%3F%24poi%3A%24center%7D&sm=c&w=1208)
?%24center=center&%24poi=poi&%24product-image%24=&fmt=auto&h=500&poi=%7B%24this.metadata.pointOfInterest.x%7D%2C%7B%24this.metadata.pointOfInterest.y%7D%2C%7B%24this.metadata.pointOfInterest.w%7D%2C%7B%24this.metadata.pointOfInterest.h%7D&scaleFit=%7B%28%24this.metadata.pointOfInterest%29%3F%24poi%3A%24center%7D&sm=c&w=1208)